Would you like to run your own Minecraft Java Edition server? Would you like to run it on a Virtual Machine instead of using your normal computer or a server elsewhere for the purpose? How can it be done? How can you give access to the server to other computers on the local network? Is it possible to make it reachable for people outside your internal network?
Creating a Minecraft Java Edition server on an Ubuntu server is very easy. It doesn’t matter if it is a Virtual Machine or if you rent a VPS somewhere. This article will show you how to install everything required to run a server, and it will also give you further help once the server is ready to be used.
Installing a Minecraft Java Edition server on an Ubuntu VM.
You first need to create a Virtual Machine with an Ubuntu server installed in VirtualBox. This is easy, and hopefully, you know how this is done. Make sure to have downloaded the installation file for Ubuntu server to your computer and use it as you install the server on your virtual machine.
Now it is time to run the following commands to install the Minecraft Java Edition server on your virtual machine.
sudo add-apt-repository ppa:openjdk-r/ppa
sudo apt update
sudo apt upgrade
sudo apt install openjdk-17-jre-headless
These are the basic requirements for running Minecraft Java Edition on your server. Now it is time to install the package itself. You first need to go to https://www.minecraft.net/en-us/download/server. At the time of writing, the newest version of the server is 1.20.1. Copy the file address you need to download from the website and then run the command, as shown below.
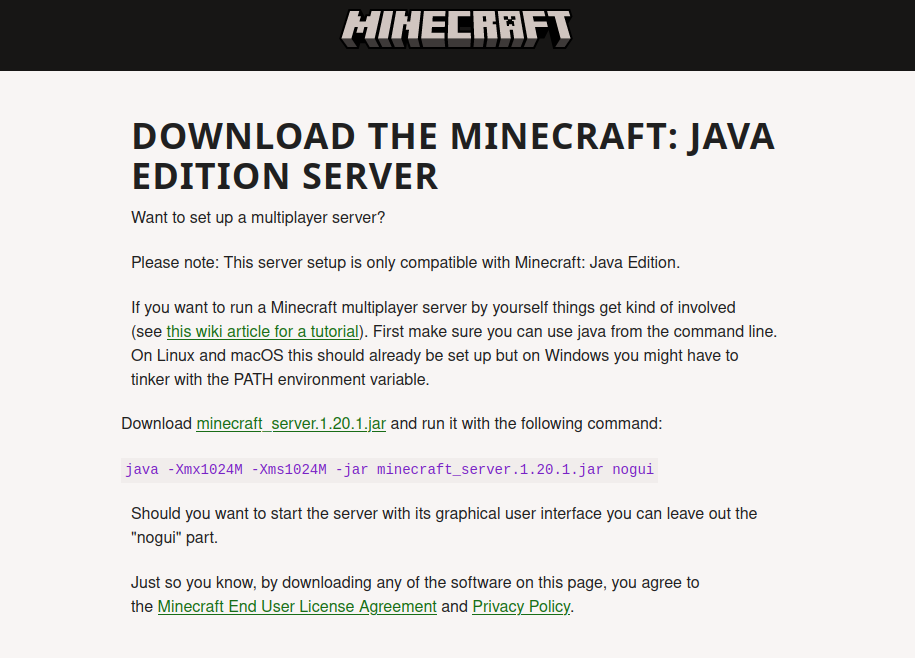
Now that you have the address, run the following command. Make sure to change the address of the file below to the newest version of the server.
wget https://piston-data.mojang.com/v1/objects/84194a2f286ef7c14ed7ce0090dba59902951553/server.jarThis will download the necessary files to your server. It is time to run the server file. Use the following command. If the file you just downloaded has a different name than server.jar, change it as you run the command below.
java -Xms1024M -Xmx1024M -jar server.jar noguiAs you run the command, you will see an error message saying that it failed to load eula.txt. Run the following command.
nano eula.txtAs you open the file, change the text saying eula=false and make it say eula=true. Click CTRL-X and then Y to close and save the file.
Now it is time to run the command above again to start the server. This time it will load and the server should run properly.
java -Xms1024M -Xmx1024M -jar server.jar noguiThere is, however, a slight problem. How can you connect other computers to the Minecraft Java edition server running on a virtual machine?
How to connect to the Minecraft server running on a Virtual Machine?
If the server is running on a VPS it is very easy. You only need to enter the IP address of the VPS in the Multiplayer option, and it will be found. But with a Virtual Machine running on your own computer, it is a bit more complicated. This is how you can solve it and make the server available to everyone on your locale network.
Make the Minecraft server available to other machines on the local network.
Open the VirtualBox and open the settings of the Minecraft server. Go to the network settings and change the options from NAT to Bridged Adapter.

When you use Bridged Adapter, the virtual machine gets its very own IP address on the local network, making it much easier to connect with to other machines.
As you make these changes, you might have to restart the virtual machine. Now run the following command.
ip a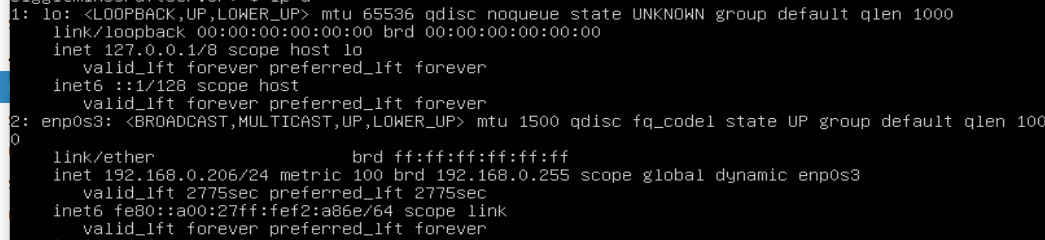
If you look at the image below, you can see the outcome of the command. The important is the inet address (in my case: 192.168.0.206). This is the IP address of the VM running the Minecraft Java Edition server.
Other computers on the local network can easily connect to the server by using this address. Launch Minecraft Java Edition, choose Multiplayer, and then click Add Server. It should look something like this.
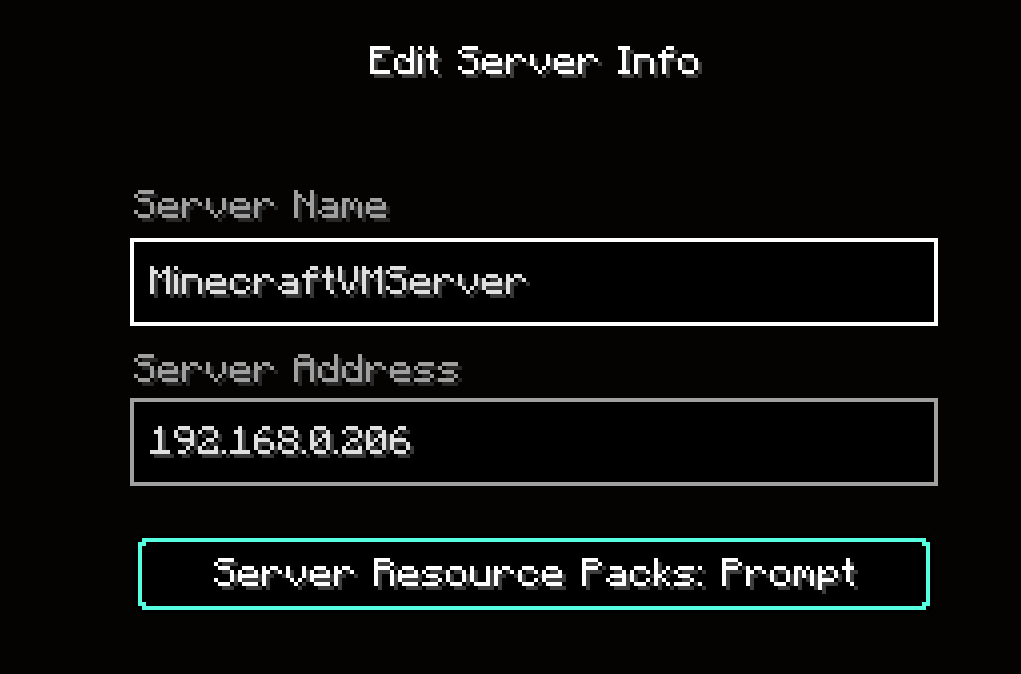
When this is done, you are ready to connect to the brand-new Minecraft server from all the machines on the local network. However, you need to be aware of a few things.
How to change settings for the Minecraft server.
Would you like to change some settings for the Minecraft server? Would you like it to run in creative mode and not survival mode? Would you like it to be harder or easier? If you want to change settings for the server, run the following command to edit the server configuration file. As you finished, click CTRL-X and click Y to save the changes.
nano server.propertiesIn the file, you can give the server a new name (find MOTD), you can setup the maximum number of players, enable or disable PVP, and several other settings.
How to make sure the server gets the same IP address every time?
One thing is that a router will often give your server a different IP address if it is disconnected from the network and then reconnects. In other words, you might need to use the IP address command to find the new IP address as you start the server over again after it has been disconnected for an hour or more. If the IP address has changed, you need to change the server’s IP address in the Minecraft application on the devices you want to play on in the server settings.
If you are a system administrator with access to the router an option is to find the MAC address of your Virtual Machine. It can be found among the connected devices on the router itself, but you can also find it in the advanced network options on your virtual machine settings (where we earlier decided to use Bridged Adapter).
As you have the MAC address of the Virtual Machine, tell the router always to give the same IP address to this MAC address. This can often be done under Advanced Settings, DHCP settings, or similar options. By doing this, you tell the router always to hand out the same IP address whenever that given MAC address asks for an IP address from the DHCP server. As a result, you don’t need to constantly change the server’s settings in the Minecraft game, but the server will always be accessible at the same address.
How to load the Minecraft server automatically as you start or reboot the Virtual Machine?
Would you like the Minecraft Java Edition server to load automatically as you start or reboot the Virtual Machine? This is a very basic script that will get the job done.
sudo nano /etc/systemd/service/minecraftserver.serviceCopy the following content to the file. Make sure to change the username to the username of the user who has installed the server and that will run the server. You should also update the working directory to the directory in which you have installed the server files.
[Unit]
Description=Start-Minecraft
[Service]
User=yourubuntuserveruser
WorkingDirectory=/home/yourubuntuserveruser (if that is where you have installed the server files)
Restart=on-failure
ExecStart=/usr/bin/java -Xms1024M -Xmx1048M -jar server.jar –nogui
[Install]
WantedBy=multi-user.target
When you have finished the work, save the file. Now you need to run the following commands.
sudo systemctl enable minecraftserver.serviceThis command will enable the script to run automatically upon reboot or as you power up the server. You can give it a try. If you want to check if it has been successful, run the following command.
sudo systemctl status minecraftserver.service
As you can see, the server is active and running. If you see some other error message, it means something didn’t go well. It might be that you have done some error with the username or the directories in the service file. You can try to change the content of the service file that we edited earlier. After editing the file, run the following two commands to try it over again and then you can check if it is working again.
sudo systemctl daemon-reload
sudo systemctl start minecraftserver.service
sudo systemctl status minecraftserver.service
Did you succeed this time? Is the server running properly? If not, it is time to hunt for more bugs. Hopefully, however, it is now running and it should start automatically as you start up the server.
Can I connect to the server from machines outside the local network?
It is possible, but it is a bit more complicated and will require you to do further modifications on your router. The Minecraft server runs by default on port 25565. You will need to open requests to this port on the router and forward them to the local IP address of the server on your local network (in my case: 192.168.0.206). This sounds easy, but depending on the complexity of your router, it can be hard to do, or it might be extremely easy.
You should also be aware that opening a port on your router for access from the outside suddenly makes your network much easier to infiltrate, meaning it is a big security risk.
Good luck operating a Minecraft Java Edition server on your own Virtual Machine with VirtualBox.
I have tried to give you all the necessary instructions in this article. Would you like to read more about how you can set up a Minecraft Bedrock server in Ubuntu? I have written an article about that earlier, so check it out for more information.
If you have further questions, problems, or input, use the comment field below.
