Would you like to create a server for Minecraft Java edition and keep it running on a VPS using Ubuntu as the operating system? In this article, we will show you step by step how to create your server and all the commands needed in order for the server to get up and running.
A few weeks ago, we wrote an article showing how you can set up a server for Minecraft Bedrock edition on a VPS with Ubuntu. Today, it is time to show you how you can do the same for Minecraft Java Edition. It is very easy and you can be ready with your brand new server in less than 30 minutes!

1. Buy a VPS on Contabo
The first step is to visit the website of Contabo and purchase their cheapest VPS package. Contabo is a very cheap VPS provider with a fantastic product, giving you much more for less.

The VPS S package is more than enough and the price is 5 Euro per month/6 Dollar per month. This has enough capacity to run a Minecraft server, making it ideal for this purpose.
When you have selected the server, just run with all the basic settings (use Ubuntu 20.04 as your operating system). As you select storage type, you can choose between 50 GB NVMe or 200 GB SSD. This doesn’t really matter, but as 50 GB is more than enough, you might as well choose this option as it is faster.
Make sure to generate a root password for your server and copy this and store it somewhere, because you will need it later.
Now you pay for your VPS and in some minutes you will receive an email telling you that everything is in order.
- While waiting, download SolarPutty to your computer. This is the program you will use to communicate with your VPS.
2. Make the preparations on your VPS
In the email you have received from Contabo (not the welcome email, but the email with your login data), you will see the IP address of your VPS. Open SolarPutty, create a new connection, give the connection a name, copy the IP address, and then use root as your username and paste the password generated earlier.
You can now click connect in order to connect to your server. You will receive a notification as you connect to the server for the first time. Simply click yes/accept and you will be connected to the server in a few seconds.
You are now connected to the VPS and you are ready to write the needed commands in order for the server to get ready.
sudo apt update && sudo apt upgrade -y
This command will make sure that your operating system is updated and completely ready.
apt install openjdk-17-jre-headless -yThis will install the needed Java environment on your VPS.
sudo apt install screen -yThis is a program that will allow you to keep the server running, even after you have closed your connection to the server.
sudo ufw allow ssh
sudo ufw allow 25565
sudo ufw enable
reboot
This is creating the firewall rules needed for the Minecraft server to operate properly and for you to be able to connect to the server in the future. For the firewall to work, you need to reboot the system. Connect once again to the server, and continue with the following commands.
3. Create your Minecraft Java edition server
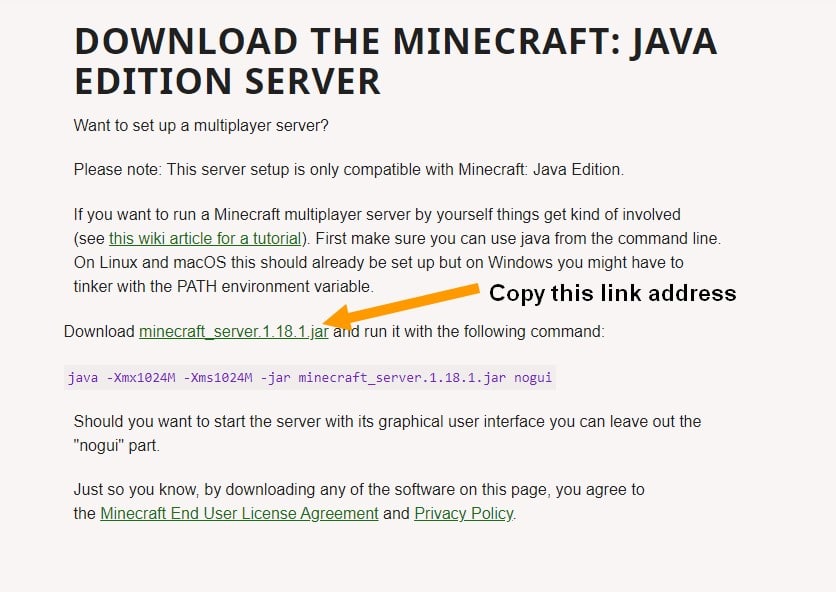
Head over to https://www.minecraft.net/en-us/download/server/ and find the latest version of the server. Copy the link. At the time of writing this article, the most recent version is: https://launcher.mojang.com/v1/objects/125e5adf40c659fd3bce3e66e67a16bb49ecc1b9/server.jar
When you have copied the link address, return to your VPS connection and use the following command to download the server package to your VPS.
wget https://launcher.mojang.com/v1/objects/125e5adf40c659fd3bce3e66e67a16bb49ecc1b9/server.jar (make sure to use the address from the website as this address might be outdated)It will take a few seconds to download the file to the VPS.
java -Xmx1024M -Xms1024M -jar server.jar noguiRun this command. This will start the server, but after a few seconds, you will receive an error message about the EULA.txt file. To fix this, do the following.
sudo nano eula.txtThis will open the file eula.txt. In the text file, change the word false to true. When this is done, click CTRL-X, followed by a yes to the answer about whether to save the file or not. Keep the filename.
screen (click enter after typing this command to get to the next screen)This will start an extra window that will allow the server to keep running, even though you close Solar Putty and disconnect from the VPS.
java -Xmx1024M -Xms1024M -jar server.jar noguiYou are now ready to start the server using the command above once again.
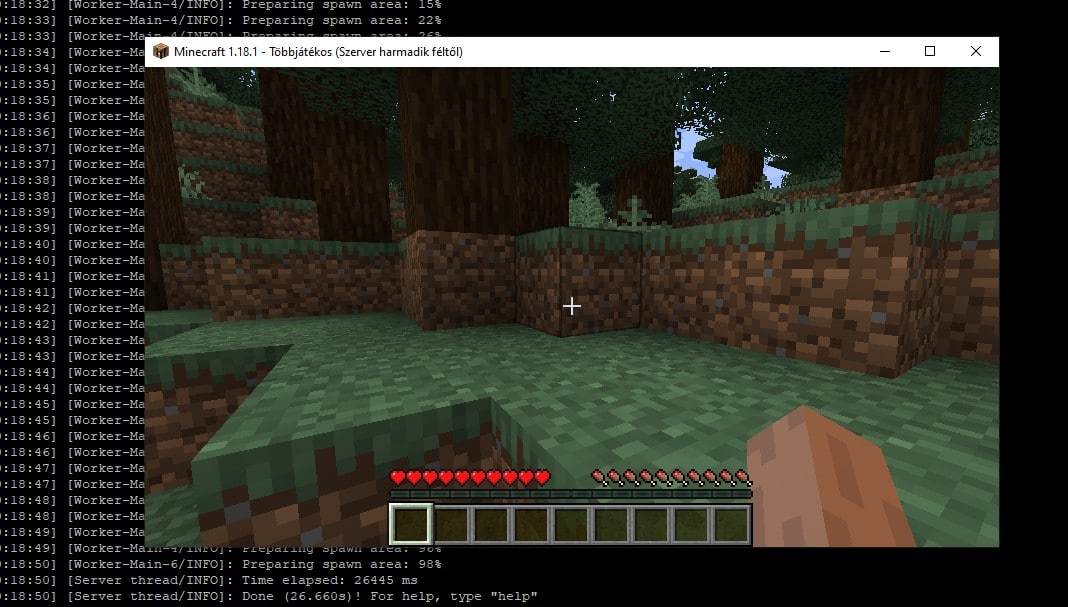
Your server is now up and running. If you open your Minecraft Java Edition, you can choose multiplayer and connect to your newly created server using the IP address of the server.
4. Some additional useful commands.
When the server is up and running, there are several commands that you might find useful that you can run. Here you can see some of them.
Make a user an operater on your Java edition server

If you want to make a user an operator in the world (the user has to be logged in to the server one time before you can do this), simply type op USERNAME and the user will become an operator and can thereafter change settings, select game modes, and much more.
Stop the server
If you want to stop the server, simply use the command stop. If you later want to restart the server, use the command from earlier in the article.
Delete the world you have created
Are you tired of the world you have created, or maybe you don’t like it? If you want to have a different world on your server, stop the server first, then run the following command.
rm -r worldThis will delete the world category (with all its subdirectories). After this, start the server once again and you will be able to have fun in your brand new world.
Make other changes to your server
There is a file named server.properties in the default directory, and if can be cool to look through the file and make changes (if you want to). To open the file, use the command below. You can close the file and save it using the CTRL-X option.
sudo nano server.propertiesYour Minecraft Java edition server is now ready, and you are hopefully having fun playing in your new world already. We hope these instructions have helped you. If you have further questions or comments, use the form below!
